Learn Angular, Angular for dummies, free AngularJS course for dummies - your first project

Now that you have hopefully set up your Angular on your computer, open up Visual Studio Code (or some other editor) and open the project folder. You will usually only working within the /src/ subfolder.
Let's get started
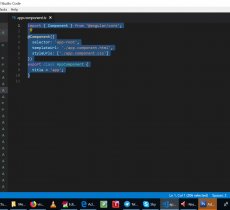
Opened up your project folder, click on the file /src/app/app.component.ts. This is an Angular component.
What are components in Angular? Angular components are the building blocks of your app, the located in the /src/app folder. The component defines all the needed imports for your component; component decorator allows you to define the template, styling, etc; and a class where your component logic should be stored. And as you can see in this file, on top of it you have the imports, and the component decorator that defines the style, templates and selector, in the middle.
The selector app-root is where the component will load. When you open /src/index.html you will see an html tag there -
Create a new component
Let's now create our first new component. To do that, in Visual Studio Code, go to View->Integrated terminal. This will open the terminal window in the bottom of the Visual Studio Code. In there type ng generate component myfirst (myfirst can be anything you want). This command will generate all the files it needs under /src/app/myfirst/. You can also use a shorthand syntax to do that, using ng g c secondone. Each time to enter either of those commands you'll also notice that your app.module.ts file gets updated with the new component information.
Nesting the components
Now open up the file /src/app/app.component.html and delete everything you have there - that's the file you can see at http://localhost:4200. See the code below. The app-myfirst comes from your /src/app/home/myfirst.component.ts file.
You should be able to see the result of what you just did at http://localhost:4200. If you can't, type ng serve in the terminal to start the service. Remember from the previous lesson that you should keep the console bit open in the browser as well. If it gives you any error, see what it is. Maybe you mistyped something, or instead of correct closing tag you wrote something wrong. As you can see from my code above, this wouldn't work, as my closing tag for app-myfirst was app-first, which can't work. Change it to app-myfirst as well and save the file.
You should also see something in the browser you didn't add there - "myfirst works!". This simply mean that the app-myfirst is currently empty.
Working with templates
Now open up the /src/app/myfirst/myfirst.component.html file and let's add some code to it.
As you can see, right now we are not doing anything else but creating a simple HTML structure.
Now, if we want to style it all, there are at least three ways of doing it. It all starts from /src/app/home/myfirst.component.ts
Styling
1. You can see that in the /src/app/home/home.component.ts your styles are coming from myfirst.component.css, so one way is to add your styles there.
2. Second version is to use inline styles, so in stead of using the myfirst.component.css file, you can write the styles directly in the /src/app/home/myfirst.component.ts instead of the myfirst.component.css file.
3. You can import some other style.
Additionally you can use global styles which you can see and change using the /src/styles.scss file. So let's start by changing that.
This should make our app (that you should always check at http://localhost:4200/) a little bit nicer.
Now open the myfirst.component.css and paste this there:
And always, don't forget to save the files! Alternatively, you can also write ng serve to the terminal window to update everything.
Property and event binding
To communicate with communicate properties from the component class to the template, they can be variables, arrays, objects, or anything, you can use this format {{propertyName}}. It's called interpolation, but if you ask me you might as well forget the name, as long as you know how to do it. Now, let's try it. First, open up /src/app/home/myfirst.component.ts again and in there after the OnInit { write
And in your /myfirst.component.html file replace "
It's all still very static, but let's start binding he properties now. In home.component.ts add the following just below the itemCount line:
And in the /home.component.html file replace
Make sure you used btnText not btntext, as otherwise it would give you the "undefined" text instead. Instead of doing it like ="btntext" you could have also done it like value="{{ btnText }}"
Note that Property binding in Angular 5 is one-way, so the component class can communicate only with the template not vice versa. But if you wanted to do two-way data binding, you can use ngModel.
Two-way binding in Angular 5
To use that you need to import FormsModule in app.module.ts which will give you access to ngModule. In order to import it, add
to the app.module.ts file and within imports part there add FormsModule.
Now go back to /myfirst.component.ts and add
And in the myfirst.component.html change
with
Learn to do Event Binding
For the Add an artist button to actually make sense, we need to add some event to it. And there are loads and loads of different events you could use, you can see them here, but for now let's just do something that makes sense. In the html, inside the submit tag, add (click)="addItem()".
Now let's go back to the .ts file and add some stuff there after bandText:
The user entries will bestored in bands array. Now we also need a way to show them all. For that we could use a for loop. For that we need to use ngFor. In the .html file again replace the line with Limp bizkit with
SO what do all those rows do? Inside the ngOnInit() the this.itemCount = this.bands.length; line shows how many bands you have now added. In the addItem() function the first line adds and element to the array bands , the value being the value you have just submitted in the bandText input. Second line empties the input again, and the third line updates the item count.
Just as a small addition, in the html you could add another button just next to the Add an artist one:
And in the .ts add this function:
Pressing on this button now clears the list.
Or you could make it possible to remove the items individually as well. The function would look like this:
And you'll need to change
with
Now clicking on a band name that you added will remove it. Obviously you might want to add some lines of codes to both removal functions, so that the itemCount would get updated as well.
Now you could say you have finished creating your very first Angular project. Although, let's be honest, it's not a very useful one, so let's continue.
Animations in Angular 5
Firstly, to use animations in Angular 5 you need to install the Angular Animations library. Here's how you do it:
And in the app.module.ts you will need to import the library like you did with the FormsModule
To add animations to your myfirst component, open the myfirst.component.ts and add this line on top of it:
And you'll also need to define the animations in the @Component part. Try this first:
Yes, this bit seems pretty complicated, and I won't go into it too much. But now to make it all work, in the .html change
to
Now that you start adding new bands in the browser you'll see an animation there.
Angular 5 router - what is it?
The name sounds funky, but the router specifies which comopnent you want to load by default when the app is loaded and which not. As we didn't set up the project with --routing flag in the beginning, we need to add routes to existing project. In the terminal type
This will create the app-routing.module.ts under src/app/app-routing.
Now in the app-routing.modules.ts paste the following config:
Now open Open app.module.ts and add the AppRoutingModule.
and in @ngmodule imports
Now, it app.component.html add
Clicking on the links in the browser will now show you appriate components.
If you wanted to, you could also add parameters to your url. In app-routing.modules.ts you would replace path: 'myfirst', with path: 'myfirst/:id', and in html you could do something like routerLink="myfirst/3". While for now, for us, it's useless. This id's can be used on more advance applications pull something from the database that has that id. To actually use that ID you'd import a component in myfirst.component.ts like
and
Services
Services are mostly used to store data and make HTTP calls. To quickly generate a service file for your project, type in ng generate service data or ng g s data. This will generate a new service file named data.
Now open up the file located at src/app/data.service.ts. The @Injectable() decorator makes it possible for us to import it into other components and access its properties and methods. And if we want to use Rxjs BehaviorSubject library to share data between components, update your file like this:
Bands has now been defined as a BehaviorSubject and band is an observable. The changeBand method is used to update the bands property.
Not that if there seems to be some kind of error, try executing that in terminal first - npm install rxjs-compat
Aftter you have generated a service you also need to edit the src/app/app.module.ts and add it to the providers array inside @ngModule. Like this - providers: , and in the beginning of the file - import { DataService } from './data.service';
To use the service in your components, open the component ts file, i.e. myfirst.component.ts, import the service in the beginning of the file and add it inside the existing constructor:
Now edit the stuff beneath the constructor to reference this._data.changeBand() when the app loads, as well as when we add or remove an item.
And in secondone.component.ts add the following:
And now, in secondone.component.html edit it like that:
Now all the bands you have added are also shown in under the "Second One" link, meaning the bands data is shared.
Creating the production build
You now have a pretty useless app that works on your computer. What makes it even more useless is the fact that ... well, it can be seen only on your computer. So now need to create a production build to upload it to our actual website.
Firstly we need to use the Angular CLI to create a build of our app. In the terminal window you COULD now type "ng build" and press enter. But this produces unoptimized files. So instead of that you could type "ng build --prod" instead - this would produce a number of optimizations and you should actually only use that command. Now the files you have just created are sitting in /dist folder. Note that if you are planning to upload the files to a subfolder, you need to run the command differently - "ng build --prod --base-href="myURL"" (the MyURL should be the FULL url, starting with http).
My working demo can be seen here - http://www.travelworldmap.com/ - it's just a random domain I happened to have empty right now.
Turning your Angular project into something slightly more useful
While our Angular project is a nonsense one, there are two other things we might need in our future projects, so it would be a good idea to add those as well. Firstly, it would be nice to connect the project to a database. And then make the app visible only to logged in users. Which means we'll need a database connection as well as user registration and authentication.
User registration and user authentication in Angular
There are a number of ways you can create the user authenitcation in Angular. You could do a token based authentication, something using oAuth, or Angular 5 authenitcation with Firebase. But just to make it easy for use, we can just download the files from there - http://jasonwatmore.com/post/2018/05/16/angular-6-user-registration-and-login-example-tutorial
Then open the Visual Studio Code, run npm install in the folder, and then ng serve and your authenitcation should now be working. However, this initial version uses a fake backend that stores users in HTML5 local storage, so we want to use a real backend service instead.
We're not going to try and rung an Angular 6 client application with the NodeJS API. For that copy or clone the code from https://github.com/cornflourblue/angular-6-registration-login-example
And run npm install in the folder again to install all required npm packages. Now go do src/app/app.module.ts and search for the line that says import { fakeBackendProvider } from './_helpers'; and delete it.
Now run npm start.
If there's an error after you've done that, something like "Cannot find name 'describe'. e2esrcapp.e2e-spec.ts", then npm install --save-dev "@types/jasmine" and in app.e2e-spec.ts on top of the file write import {} from 'jasmine';
If you also get an error related to protractor as I did, you might need to install protractor via npm install protractor.
If you're still getting an error, such as "Argument of type is not assignable to parameter of type 'Expected>'.", replace expect(page.getParagraphText()).toEqual("Welcome to angular-registration-login-example!"); with expect(page.getParagraphText()).toEqual("Welcome to angular-registration-login-example!");
Note that the fixes are required ONLY if you had a problem when starting npm.
Now you should have a working authentication application connected to NodeJS + MongoDB API.
Angular and connecting to the database
There's one thing to keep in mind - Angular is meant to create client based front end applications, so back end stuff like database connections, creating, fetching, updating etc should be done in the server side. Angular application can't directly communicate with database, so you create REST service or web API which could communicate with the database (be it SQL server, MySQL, or anything else).
If you know NODEJS, you can use that. But if not, you can implement rest service using spring boot, php or asp.net
Continued at a later date...hopefully...
Let's get started
Opened up your project folder, click on the file /src/app/app.component.ts. This is an Angular component.
What are components in Angular? Angular components are the building blocks of your app, the located in the /src/app folder. The component defines all the needed imports for your component; component decorator allows you to define the template, styling, etc; and a class where your component logic should be stored. And as you can see in this file, on top of it you have the imports, and the component decorator that defines the style, templates and selector, in the middle.
The selector app-root is where the component will load. When you open /src/index.html you will see an html tag there -
Create a new component
Let's now create our first new component. To do that, in Visual Studio Code, go to View->Integrated terminal. This will open the terminal window in the bottom of the Visual Studio Code. In there type ng generate component myfirst (myfirst can be anything you want). This command will generate all the files it needs under /src/app/myfirst/. You can also use a shorthand syntax to do that, using ng g c secondone. Each time to enter either of those commands you'll also notice that your app.module.ts file gets updated with the new component information.
Nesting the components
Now open up the file /src/app/app.component.html and delete everything you have there - that's the file you can see at http://localhost:4200. See the code below. The app-myfirst comes from your /src/app/home/myfirst.component.ts file.
<ul>
  <li><a myLink="myfirst">My First</a></li>
  <li><a myLink="secondone">Second one</a></li>
</ul>

<app-myfirst></app-first>
You should be able to see the result of what you just did at http://localhost:4200. If you can't, type ng serve in the terminal to start the service. Remember from the previous lesson that you should keep the console bit open in the browser as well. If it gives you any error, see what it is. Maybe you mistyped something, or instead of correct closing tag you wrote something wrong. As you can see from my code above, this wouldn't work, as my closing tag for app-myfirst was app-first, which can't work. Change it to app-myfirst as well and save the file.
You should also see something in the browser you didn't add there - "myfirst works!". This simply mean that the app-myfirst is currently empty.
Working with templates
Now open up the /src/app/myfirst/myfirst.component.html file and let's add some code to it.
<div class="container color-dark">
  <div class="col">
    <p>Add an artist to the list</p>
  </div>
  <div class="col">
    <p>Your favorites list</p>
  </div>
</div>
<div class="container color-light">
  <div class="col">
    <p class="sm">Add your favorite artists here</p>

    <form>
      <input type="text" class="txt" name="item" placeholder="Favorite band">
      <input type="submit" class="btn" value="Add artist">
    </form>
  </div>
  <div class="col">
    <p class="band-container">
       Limp Bizkit
    </p>
  </div>
</div>
As you can see, right now we are not doing anything else but creating a simple HTML structure.
Now, if we want to style it all, there are at least three ways of doing it. It all starts from /src/app/home/myfirst.component.ts
Styling
1. You can see that in the /src/app/home/home.component.ts your styles are coming from myfirst.component.css, so one way is to add your styles there.
2. Second version is to use inline styles, so in stead of using the myfirst.component.css file, you can write the styles directly in the /src/app/home/myfirst.component.ts instead of the myfirst.component.css file.
3. You can import some other style.
Additionally you can use global styles which you can see and change using the /src/styles.scss file. So let's start by changing that.
@import url('https://fonts.googleapis.com/css?family=Slabo:300,700');

body {
    background:#2E9CE6;
    padding: 3em;
    font-family: 'Slabo', 'Arial';
    color:#fff;
}
ul {
    list-style-type:none;
    margin:0 0 2em 0;
    padding:0;
}
ul li {
    display:inline;
    margin-right: 30px;
}
ul li a {
    font-size: 1.5em;
}
a {
    color:#fff;
    text-decoration:none;
}
This should make our app (that you should always check at http://localhost:4200/) a little bit nicer.
Now open the myfirst.component.css and paste this there:
.container {
    display: grid;
    grid-template-columns: 50% auto;
}
.col {
    padding: .4em 1.3em;
}
.color-dark {
    background: #2885C4;
}
.color-light {
    background: #57B3F1;
}

input.txt {
    border: 0;
    padding: 1em;
    width: 80%;
    margin-bottom: 2em;
}
input.btn {
    border: 0;
    display:block;
    padding:1em 3em;
    background:#A5F883;
    color:#003A61;
    margin-bottom:1em;
    cursor:pointer;
}
.band-container {
    background:#3FA0E1;
    padding:.5em;
    font-weight:bold;
    cursor:pointer;
}
And always, don't forget to save the files! Alternatively, you can also write ng serve to the terminal window to update everything.
Property and event binding
To communicate with communicate properties from the component class to the template, they can be variables, arrays, objects, or anything, you can use this format {{propertyName}}. It's called interpolation, but if you ask me you might as well forget the name, as long as you know how to do it. Now, let's try it. First, open up /src/app/home/myfirst.component.ts again and in there after the OnInit { write
itemCount: number = 5;
And in your /myfirst.component.html file replace "
Your favorites list
" with:
<p>Your bucket list ({{ itemCount }})</p>
It's all still very static, but let's start binding he properties now. In home.component.ts add the following just below the itemCount line:
btnText: string = 'Add an artist';
And in the /home.component.html file replace
<input type="submit" class="btn" value="Add artist">
with
<input type="submit" class="btn"   ="btnText">
Make sure you used btnText not btntext, as otherwise it would give you the "undefined" text instead. Instead of doing it like ="btntext" you could have also done it like value="{{ btnText }}"
Note that Property binding in Angular 5 is one-way, so the component class can communicate only with the template not vice versa. But if you wanted to do two-way data binding, you can use ngModel.
Two-way binding in Angular 5
To use that you need to import FormsModule in app.module.ts which will give you access to ngModule. In order to import it, add
import { FormsModule } from '@angular/forms';
to the app.module.ts file and within imports part there add FormsModule.
Now go back to /myfirst.component.ts and add
bandText: string = 'My first favorite artist';
And in the myfirst.component.html change
<input type="text" class="txt" name="item" placeholder="Favorite band">
with
<input type="text" class="txt" name="item" placeholder="Favorite band" ="bandText">
Learn to do Event Binding
For the Add an artist button to actually make sense, we need to add some event to it. And there are loads and loads of different events you could use, you can see them here, but for now let's just do something that makes sense. In the html, inside the submit tag, add (click)="addItem()".
Now let's go back to the .ts file and add some stuff there after bandText:
  bands =   ;

  constructor() { }

  ngOnInit() {
    this.itemCount = this.bands.length;
  }

  addItem() {
    this.bands.push(this.bandText);
    this.bandText = '';
    this.itemCount = this.bands.length;
  }
The user entries will bestored in bands array. Now we also need a way to show them all. For that we could use a for loop. For that we need to use ngFor. In the .html file again replace the line with Limp bizkit with
<p class="band-container" *ngFor="let band of bands">
  {{ band }}
</p>
SO what do all those rows do? Inside the ngOnInit() the this.itemCount = this.bands.length; line shows how many bands you have now added. In the addItem() function the first line adds and element to the array bands , the value being the value you have just submitted in the bandText input. Second line empties the input again, and the third line updates the item count.
Just as a small addition, in the html you could add another button just next to the Add an artist one:
<input type="submit" class="btn" value="Clear list" (click)="clearItems()">
And in the .ts add this function:
  clearItems() {
    this.bands =   ;
  }
Pressing on this button now clears the list.
Or you could make it possible to remove the items individually as well. The function would look like this:
  removeItem(id) {
    this.bands.splice(this.bands.indexOf(id),1);
  }
And you'll need to change
<p class="band-container" *ngFor="let goal of goals">
with
<p class="band-container" *ngFor="let band of bands" (click)="removeItem(band)">
Now clicking on a band name that you added will remove it. Obviously you might want to add some lines of codes to both removal functions, so that the itemCount would get updated as well.
Now you could say you have finished creating your very first Angular project. Although, let's be honest, it's not a very useful one, so let's continue.
Animations in Angular 5
Firstly, to use animations in Angular 5 you need to install the Angular Animations library. Here's how you do it:
npm install @angular/animations@latest --save
And in the app.module.ts you will need to import the library like you did with the FormsModule
import { BrowserAnimationsModule } from '@angular/platform-browser/animations';
To add animations to your myfirst component, open the myfirst.component.ts and add this line on top of it:
import { trigger,style,keyframes,query,stagger,transition,animate } from '@angular/animations';
And you'll also need to define the animations in the @Component part. Try this first:
nimations: [

    trigger('bands', [
      transition('* => *', [

        query(':enter', style({ opacity: 0 }), {optional: true}),

        query(':enter', stagger('300ms', [
          animate('.6s ease-in', keyframes([
            style({opacity: 0, transform: 'translateY(-75%)', offset: 0}),
            style({opacity: .5, transform: 'translateY(35px)',  offset: 0.3}),
            style({opacity: 1, transform: 'translateY(0)',     offset: 1.0}),
          ]))]), {optional: true})
      ])
    ])

  ]
Yes, this bit seems pretty complicated, and I won't go into it too much. But now to make it all work, in the .html change
<div class="container color-light">
to
<div class="container color-light" ="bands.length">
Now that you start adding new bands in the browser you'll see an animation there.
Angular 5 router - what is it?
The name sounds funky, but the router specifies which comopnent you want to load by default when the app is loaded and which not. As we didn't set up the project with --routing flag in the beginning, we need to add routes to existing project. In the terminal type
ng g module app-routing
This will create the app-routing.module.ts under src/app/app-routing.
Now in the app-routing.modules.ts paste the following config:
import { NgModule } from '@angular/core';
import { RouterModule, Routes } from '@angular/router';
import { MyfirstComponent } from '../myfirst/myfirst.component';
import { SecondoneComponent } from '../secondone/secondone.component';

const routes: Routes = [
  {
      path: 'myfirst',
      component: MyfirstComponent,
  },{
    path: 'secondone',
    component: SecondoneComponent,
}
];

@NgModule({
    imports: [
        RouterModule.forRoot(routes)
    ],
    exports: [
        RouterModule
    ],
    declarations:
})
export class AppRoutingModule { }
Now open Open app.module.ts and add the AppRoutingModule.
import { AppRoutingModule } from './app-routing/app-routing.module';
and in @ngmodule imports
AppRoutingModule,
Now, it app.component.html add
Clicking on the links in the browser will now show you appriate components.
If you wanted to, you could also add parameters to your url. In app-routing.modules.ts you would replace path: 'myfirst', with path: 'myfirst/:id', and in html you could do something like routerLink="myfirst/3". While for now, for us, it's useless. This id's can be used on more advance applications pull something from the database that has that id. To actually use that ID you'd import a component in myfirst.component.ts like
import { ActivatedRoute } from '@angular/router';
and
export class AboutComponent implements OnInit {

  constructor(private route: ActivatedRoute) {
    this.route.params.subscribe(res => console.log(res.id));
  }

  ngOnInit() {
  }

}
Services
Services are mostly used to store data and make HTTP calls. To quickly generate a service file for your project, type in ng generate service data or ng g s data. This will generate a new service file named data.
Now open up the file located at src/app/data.service.ts. The @Injectable() decorator makes it possible for us to import it into other components and access its properties and methods. And if we want to use Rxjs BehaviorSubject library to share data between components, update your file like this:
import { Injectable } from '@angular/core';
import { BehaviorSubject } from 'rxjs/BehaviorSubject';

@Injectable()

export class DataService {

  private bands = new BehaviorSubject<any>(  );
  band = this.bands.asObservable();

  constructor() { }

  changeBand(bandl) {
    this.bands.next(band)
  }

}
Bands has now been defined as a BehaviorSubject and band is an observable. The changeBand method is used to update the bands property.
Not that if there seems to be some kind of error, try executing that in terminal first - npm install rxjs-compat
Aftter you have generated a service you also need to edit the src/app/app.module.ts and add it to the providers array inside @ngModule. Like this - providers: , and in the beginning of the file - import { DataService } from './data.service';
To use the service in your components, open the component ts file, i.e. myfirst.component.ts, import the service in the beginning of the file and add it inside the existing constructor:
constructor(private _data: DataService) { }
Now edit the stuff beneath the constructor to reference this._data.changeBand() when the app loads, as well as when we add or remove an item.
  ngOnInit() {
    this.itemCount = this.bands.length;
    this._data.band.subscribe(res => this.bands = res);
    this._data.changeBand(this.bands);
  }

  addItem() {
    this.bands.push(this.bandText);
    this.bandText = '';
    this.itemCount = this.bands.length;
    this._data.changeBand(this.bands);
  }

  clearItems() {
    this.bands =   ;
  }

  removeItem(id) {
    this.bands.splice(this.bands.indexOf(id),1);
    this._data.changeBand(this.bands);
  }
And in secondone.component.ts add the following:
// Other imports..
import { DataService } from '../data.service';
import { ActivatedRoute } from '@angular/router';
import { Router } from '@angular/router';

// @Component Decorator

export class SecondoneComponent implements OnInit {

  bands: any;

  constructor(private route: ActivatedRoute, private router: Router, private _data: DataService) {
    this.route.params.subscribe(res => console.log(res.id));
  }

  ngOnInit() {
    this._data.band.subscribe(res => this.bands = res);
  }

  sendMeHome() {
    this.router.navigate(  );
  }

}
And now, in secondone.component.html edit it like that:
<p>
  This is what I'm all about. <a href="" (click)="sendMeHome()"><strong>Take me back</strong></a>.
</p>

<ul>
  <li *ngFor="let band of bands">
    {{ band }}
  </li>
</ul>
Now all the bands you have added are also shown in under the "Second One" link, meaning the bands data is shared.
Creating the production build
You now have a pretty useless app that works on your computer. What makes it even more useless is the fact that ... well, it can be seen only on your computer. So now need to create a production build to upload it to our actual website.
Firstly we need to use the Angular CLI to create a build of our app. In the terminal window you COULD now type "ng build" and press enter. But this produces unoptimized files. So instead of that you could type "ng build --prod" instead - this would produce a number of optimizations and you should actually only use that command. Now the files you have just created are sitting in /dist folder. Note that if you are planning to upload the files to a subfolder, you need to run the command differently - "ng build --prod --base-href="myURL"" (the MyURL should be the FULL url, starting with http).
My working demo can be seen here - http://www.travelworldmap.com/ - it's just a random domain I happened to have empty right now.
Turning your Angular project into something slightly more useful
While our Angular project is a nonsense one, there are two other things we might need in our future projects, so it would be a good idea to add those as well. Firstly, it would be nice to connect the project to a database. And then make the app visible only to logged in users. Which means we'll need a database connection as well as user registration and authentication.
User registration and user authentication in Angular
There are a number of ways you can create the user authenitcation in Angular. You could do a token based authentication, something using oAuth, or Angular 5 authenitcation with Firebase. But just to make it easy for use, we can just download the files from there - http://jasonwatmore.com/post/2018/05/16/angular-6-user-registration-and-login-example-tutorial
Then open the Visual Studio Code, run npm install in the folder, and then ng serve and your authenitcation should now be working. However, this initial version uses a fake backend that stores users in HTML5 local storage, so we want to use a real backend service instead.
We're not going to try and rung an Angular 6 client application with the NodeJS API. For that copy or clone the code from https://github.com/cornflourblue/angular-6-registration-login-example
And run npm install in the folder again to install all required npm packages. Now go do src/app/app.module.ts and search for the line that says import { fakeBackendProvider } from './_helpers'; and delete it.
Now run npm start.
If there's an error after you've done that, something like "Cannot find name 'describe'. e2esrcapp.e2e-spec.ts", then npm install --save-dev "@types/jasmine" and in app.e2e-spec.ts on top of the file write import {} from 'jasmine';
If you also get an error related to protractor as I did, you might need to install protractor via npm install protractor.
If you're still getting an error, such as "Argument of type is not assignable to parameter of type 'Expected
Note that the fixes are required ONLY if you had a problem when starting npm.
Now you should have a working authentication application connected to NodeJS + MongoDB API.
Angular and connecting to the database
There's one thing to keep in mind - Angular is meant to create client based front end applications, so back end stuff like database connections, creating, fetching, updating etc should be done in the server side. Angular application can't directly communicate with database, so you create REST service or web API which could communicate with the database (be it SQL server, MySQL, or anything else).
If you know NODEJS, you can use that. But if not, you can implement rest service using spring boot, php or asp.net
Continued at a later date...hopefully...
more in learn
Learn Angular, Angular for dummies, free AngularJS course for dummies - setting it up
Angular at first glance, even if you know a web development language like PHP before, looks extremely confusion. I'm talking about my own experience.
Angular at first glance, even if you know a web development language like PHP before, looks extremely confusion. I'm talking about my own experience.
  |